


How to Recover Google Drive Files Quickly and Securely
When digital disaster strikes, learning how to recover Google Drive files becomes your absolute top priority. Losing critical data induces immediate panic. Whether you are missing years of personal photos, a vital client presentation, or extensive financial spreadsheets, accidentally emptying your digital trash bin feels like a permanent loss. Fortunately, modern cloud storage architecture is highly resilient. This comprehensive guide will show you exactly how to restore your data, provided you act within the crucial 25-day timeframe.
The Short Answer: Can You Recover Google Drive Files After Emptying the Trash?
Yes. If you permanently deleted documents from your Trash bin, you can still recover Google Drive files because Google retains that data on their backend servers for a limited grace period. As long as the deletion occurred less than 25 days ago, the original file owner can trigger an automated restoration process through the official Help Center.
This guide breaks down the exact protocol to retrieve your data, verify your identity, and get your missing documents back into your account safely and within minutes.
Understanding Data Retention Before You Recover Google Drive Files
Before initiating the automated recovery sequence, understanding how Google handles deleted entities ensures your account meets the criteria for backend restoration.
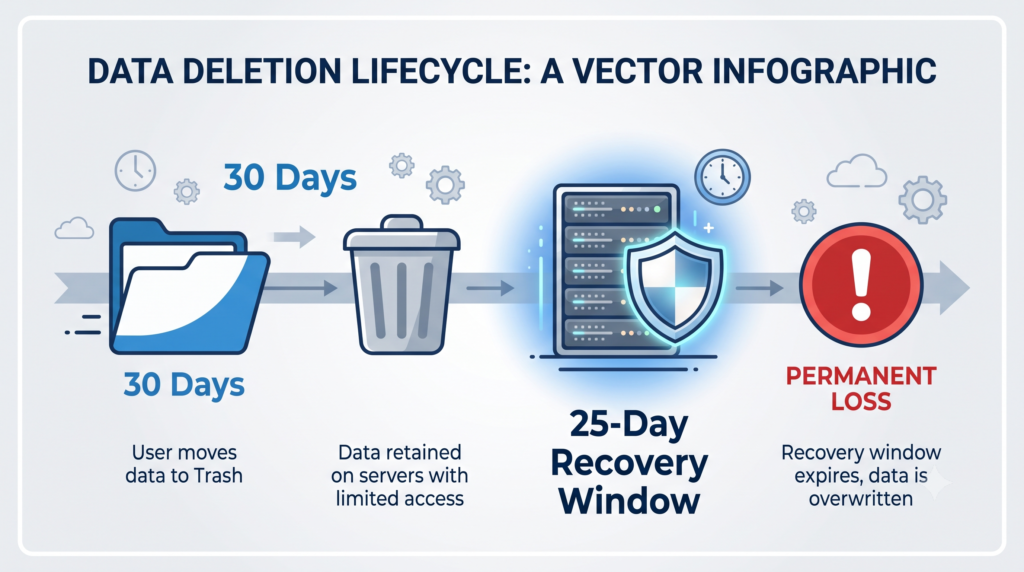
The 30-Day Trash Rule vs. The 25-Day Google Drive Recovery Window
When you delete a document, it moves directly to your Trash folder. Items residing in the Trash are automatically and permanently purged after 30 days.
However, if you manually click “Empty Trash” or if that 30-day automatic purge occurs, the files enter a secondary state of deletion on Google’s backend servers. This creates a critical 25-day recovery window. During this specific timeframe, a support automation protocol (the “Google robot”) can reach into the server architecture and reinstate the lost data. Once 25 days pass post-permanent deletion, the data blocks are overwritten and it becomes impossible to recover Google Drive files.
Core Prerequisites to Restore Deleted Google Drive Files
To guarantee the automated system can process your request to recover Google Drive files, verify the following conditions:
- You Must Be the Original Owner: You can only restore documents that you explicitly created or uploaded. If a colleague owned the document and shared it with you, their deletion removes your access. You must ask the owner to initiate the recovery.
- Personal Account Limitations: This automated tool is designed exclusively for standard personal Google Accounts (
@gmail.com). If you utilize Google Workspace through an employer or school, you must contact your domain administrator, who has access to a separate Admin Console restoration utility.
Step-by-Step Guide to Recover Google Drive Files
Follow these exact steps to successfully recover Google Drive files and trigger the automated restoration system. Avoid using incognito or private browsing modes for this process, as cross-tab session authentication is required.
Step 1: Authenticate Your Account to Retrieve Google Drive Data
First, ensure your browser session is actively authenticated with the specific profile that owned the lost data.
- Open your web browser.
- Navigate directly to your Google Account Personal Info dashboard:
[https://myaccount.google.com/personal-info](https://myaccount.google.com/personal-info) - Sign in using the exact credentials of the account that suffered the data loss.
Step 2: Access the Help Center to Recover Google Drive Files
Once authenticated, open a new tab in the same browser to maintain your active login session.
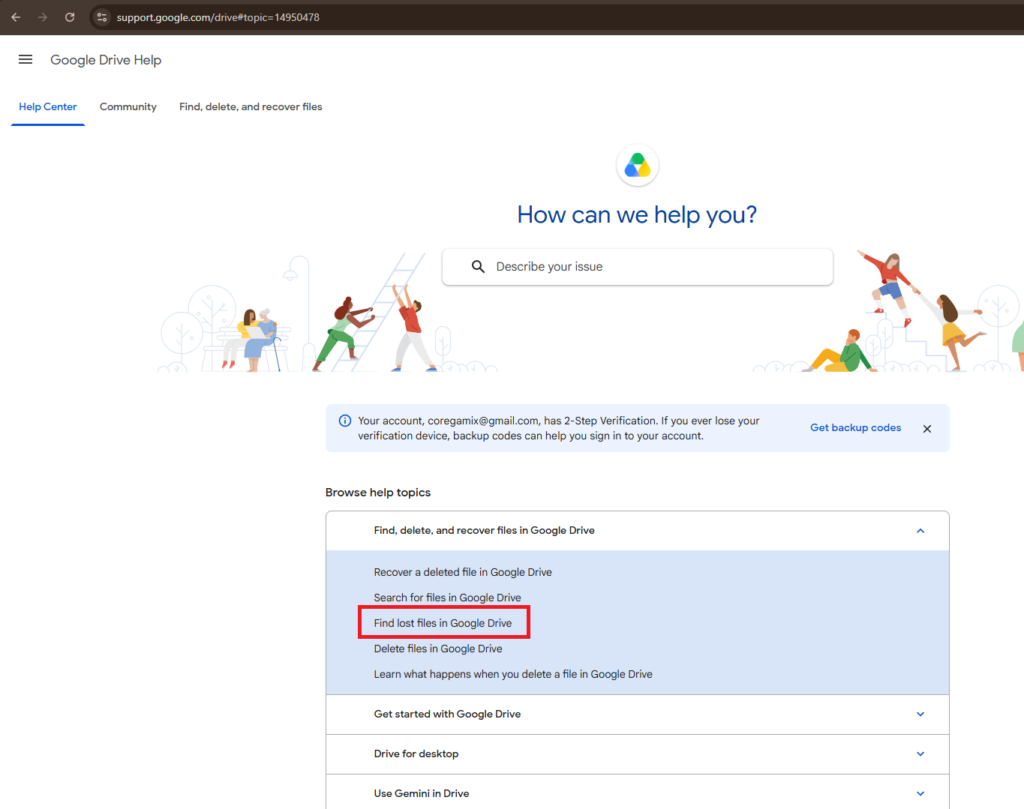
- Go directly to the official Drive recovery topic link:
[https://support.google.com/drive#topic=14950478](https://support.google.com/drive#topic=14950478) - In the primary support menu, locate and click on the option labeled Find lost files in Google Drive.
Step 3: Trigger the Google Drive File Recovery Form
The landing page will load with various troubleshooting steps for misplaced data.
- Scroll down past the standard text-based troubleshooting advice.
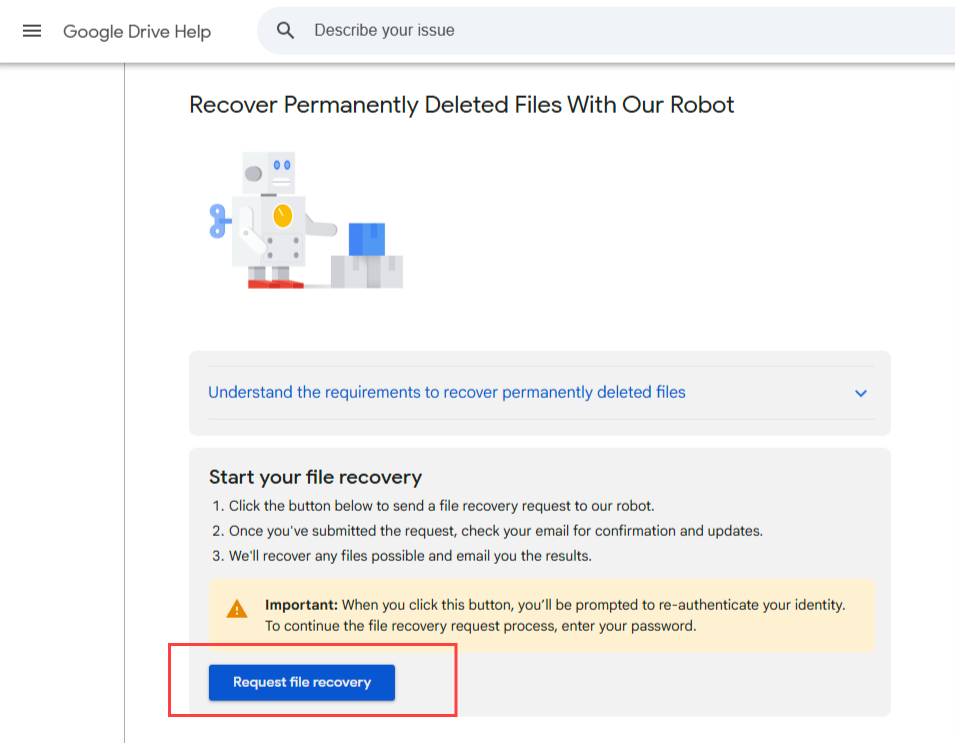
- Locate the button or hyperlink distinctly titled Request file recovery. Click it to proceed.
- The system will prompt you to sign in again or verify your password. This ensures a malicious actor isn’t attempting to access your cloud storage.
Step 4: Navigate the Secure File Recovery Interface
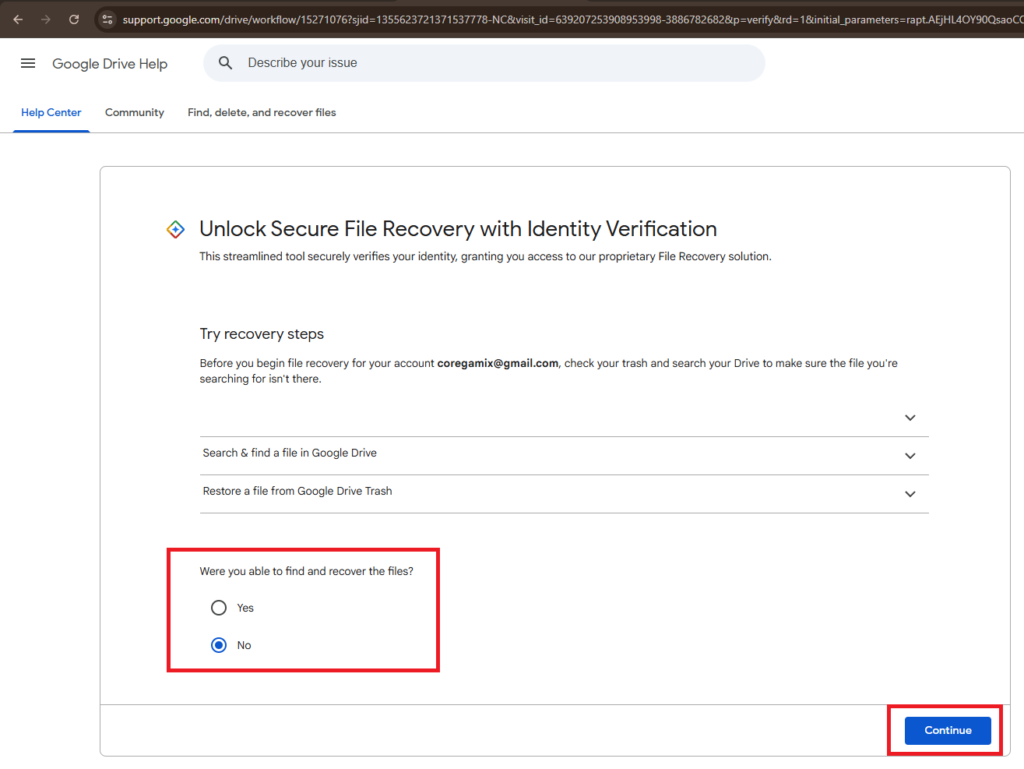
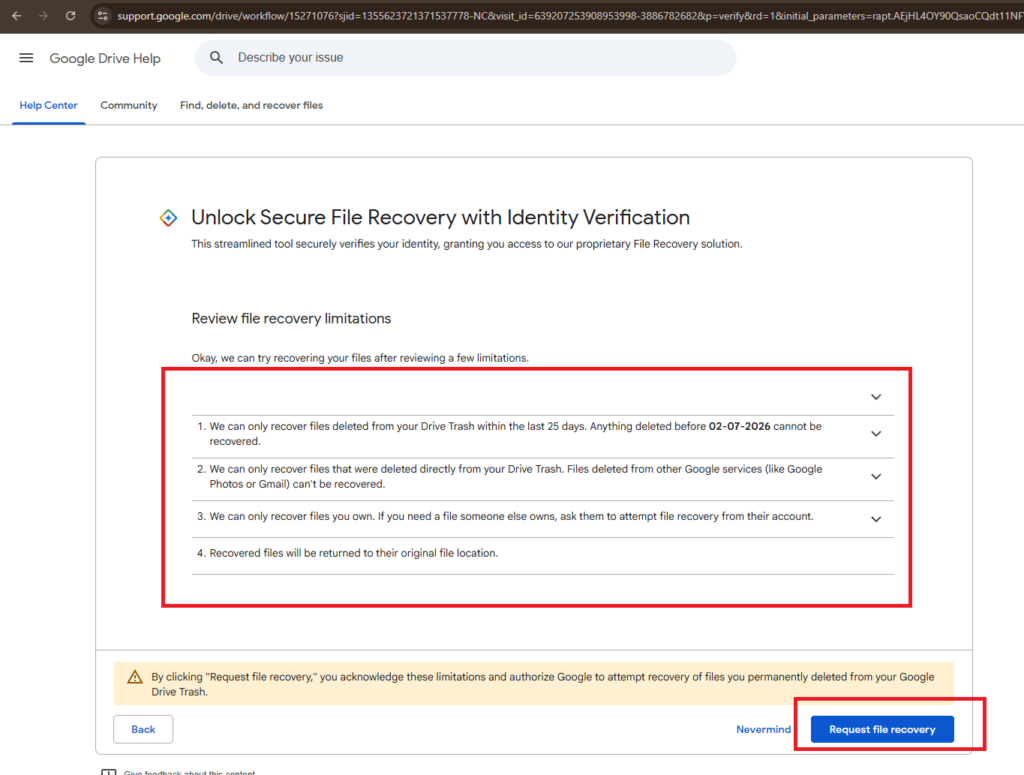
After passing authentication, a new web page will launch titled Unlock Secure File Recovery with Identity Verification.
- Read the provided prompt carefully. The automated system will ask: “Were you able to find and recover the files?”
- Because you have already checked your Trash bin and know the files are permanently deleted from your frontend view, select No.
- Click the Continue button to advance
Step 5: Confirm and Launch the Google Drive File Restoration
The final screen presents critical information regarding the recovery parameters, outlining that all entities deleted within the preceding 25-day grace period will be pulled back into your storage.
- Review the confirmation details.
- Click the final Request file recovery button.
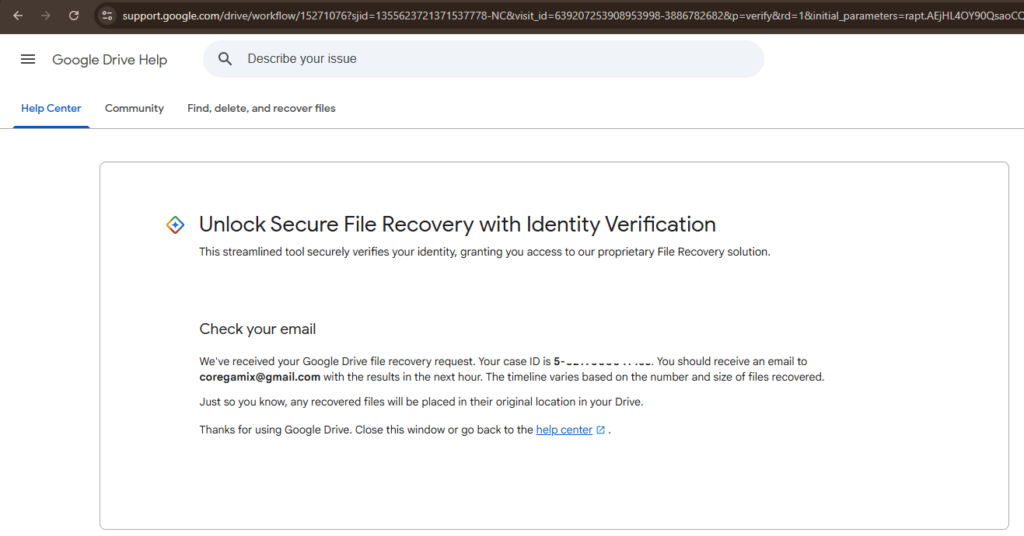
- You will receive an on-screen confirmation message stating that the request is in progress and the Google robot has started to recover Google Drive files for your account.

Managing the Process After You Recover Google Drive Files
Once the automated script initiates, you do not need to keep the recovery webpage open. The complex restoration happens entirely on Google’s servers.
- Monitoring Live Progress: Open your Drive dashboard in a new tab.
- Refresh Your Browser: The missing files will not appear all at once in a single batch. Keep refreshing your dashboard periodically. Depending on the volume of data requested, this migration can take anywhere from a few minutes to a few hours.
- Final Email Confirmation: Once the server finishes the complete restoration of all eligible files, you will receive an automated email confirmation directly to your Gmail inbox.
Best Practices to Avoid Needing to Recover Google Drive Files
Relying on backend server recovery is an emergency measure. Implementing robust digital hygiene and data redundancy drastically prevents the need for panic-inducing recovery protocols.
1. Implement the 3-2-1 Backup Strategy
Never rely on a single cloud provider as your absolute only data repository. The industry-standard 3-2-1 rule dictates:
- Keep 3 total copies of your important data.
- Store them on 2 different types of media (e.g., local hard drive and cloud storage).
- Ensure 1 copy is located entirely offsite (such as a separate cloud ecosystem or a disconnected external SSD).
2. Utilize Google Takeout Quarterly
Make it a strict habit to use the official Google Takeout utility (takeout.google.com) every three months. This free tool allows you to export a comprehensive, downloadable archive of your entire Google account footprint.
3. Audit Shared Folder Permissions Regularly
Data loss frequently occurs in collaborative environments when permissions are poorly managed. Regularly review who holds “Editor” access to your vital folders. Change external collaborators to “Viewer” or “Commenter” status immediately once their active contribution phase is complete.
Frequently Asked Questions (FAQ) About Google Drive Data Recovery
Can I recover Google Drive files individually instead of restoring everything at once? No. The automated tool operates strictly on a bulk-restore basis. It effectively rolls back your Trash state, automatically restoring every single file that was permanently deleted within the 25-day recovery window. You will need to let the process finish and manually delete what you truly wanted gone.
What happens if it has been more than 25 days since I emptied the trash? If the 25-day grace period has expired, the data blocks are permanently purged and overwritten on Google’s backend servers. At that precise point, the files cannot be recovered.
Does this specific recovery method work for Google Photos? No. This specific workflow is engineered exclusively for Drive files. Google Photos utilizes its own separate Trash bin architecture, which retains deleted photos for 60 days before permanent deletion.
Why aren’t my recovered files showing up immediately in my dashboard? The automated recovery script takes computational time to pull data from server backups and reintegrate it safely into your live interface. Keep refreshing your interface and wait for the official confirmation email before assuming the process failed.d changing your password.
Need More Help with Data Security?
If you have successfully managed to recover Google Drive files, now is the perfect time to audit your overall digital security and backup routines. For independent, highly authoritative advice on establishing a foolproof data protection strategy, we highly recommend reading the Cybersecurity & Infrastructure Security Agency (CISA) official guide to data backups. Taking proactive steps today ensures you never have to panic over lost cloud data again!
For more tutorials like this click here